How to make a sketchbook with your own hands? How to make a sketchbook for drawing?
Notepad for sketches and records has long ceasedbe an exceptional attribute of creative individuals. Of course, artists, sculptors, writers and designers necessarily have in their arsenal not one album for sketches. But people far from the art world appreciated the opportunity to have a sketchbook at hand. With their own hands created notebooks demonstrate the creativity of the owner, and notes, photos, cartoons that fill the pages, allow you to save precious moments of life.

Why do I need a sketchbook?
The sketch album was originally usedonly for its intended purpose. Artists are constantly in need of practice, so the presence of a notebook for drawing in the bag makes it possible to take up creative work at any time: to capture the landscape, the scene, to fix the suddenly born idea, to depict someone's portrait. Such instant sketches are often made by architects, designers, advertisers. Sketchbooks artists often represent genuine masterpieces, which can be considered for hours.
Writers and journalists also do not deny themselvespleasure to have in a constant access a convenient tool for work. Thinking thoughts come suddenly, and if they are not written down, then after a while they evaporate without a trace.
And lovers of travel like to return to their travel travel books. They keep the impressions of the trip, small pleasures and discoveries.
How to make a sketchbook?
You can buy a ready notepad. Now there are so many great notebooks on sale that you can choose the right instance for hours. But it's more exciting to create an album yourself. Then you can give it an individual character. You have the opportunity to put in your work those qualities that are important to you.
Therefore, before you make your sketchbook yourhands, think over every little thing. Decide what size you need the album. Will you always carry it with you or do you take it to the open air occasionally? Think about what format it will be. Perhaps it's more convenient for you to work with a square notepad. Or you are used to sketching on rectangular sheets. Binding also matters. There are options with the possibility of adding sheets, there are book covers, bindings on springs, strings. But from what you do not need to give up, it's from the tablet. Hard cardboard allows you to use a notebook in any circumstances, giving a solid support for a pencil or pen.
We choose the material
So, we create a sketchbook with our own hands. To do this, you need to purchase paper, cardboard, cloth or leather, glue. If you intend to sew sheets together, then get strong threads (preferably nylon), a needle. To bind, we need gauze. And prepare a press and scissors.
When buying paper, think, for what purposes do youcollect a notebook. Sheets can be lined and clean. Density, texture and color of the paper can also be different. For the sake of convenience, many people sew several kinds of sheets into the notebook at once. Part for watercolors, part for records, part for pencil sketches.
We are engaged in binding
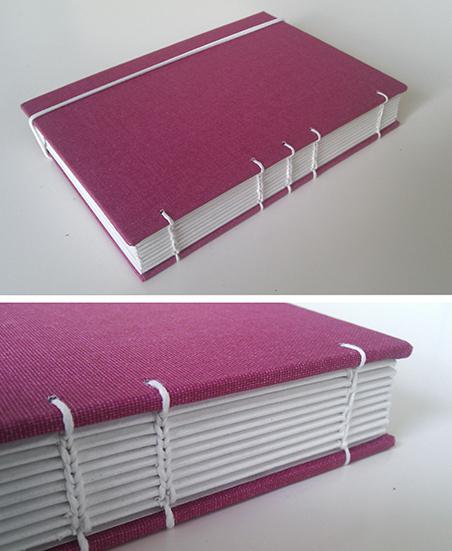
Let's look at the factory sketchbook. With my own hands, repeating the book binding is not so difficult. Only patience and accuracy are needed.
The paper you have prepared for yourthe next album, you need to sew in small notebooks. To do this, fold the sheets in half, and then add them together, connecting them to the folds. Do not overly thick notebooks. Take three sheets.
After that, in each of the notebooks we do fiveholes. In order to place them evenly on one level, you need to pierce holes on one of the notebooks in the markup. But on the subsequent booklets, make the punctures according to the ready-made template. As the last and will be your "reference" notebook.

Now we start sewing. We introduce the needle into the last hole, bring it out, and then again we pass the needle with the thread, but already into the hole of the second notebook. Now we have a thread inside the booklet number two. It is necessary to bring the needle out again using a neighboring puncture. The next step is to pass the thread inside the notebook number one. And we will pull the needle out through the same hole, grabbing the thread stretched inside the booklet. Further we move along the familiar scheme, not forgetting to grasp with the needle the strings stretched at the previous stage.
Clamping the exercise books among themselves is even easier. Just when we pull the thread out, then we catch the jumper on the previous notebook in passing. Then you re-insert the needle through the hole in the inside of the book. In the final, you should get pretty pigtails. In some cases, they do not even close, leaving as decorative elements.
Cover
Now your sketchbook for drawing shouldget a cover. To do this, we glue the gauze on the root of the notebook. Then we cut out two large squares or a rectangle from the cardboard (it's better to take thick, well-hardened sheets) (all depends on the selected form of the notebook) and one narrow rectangular rectangle (it will close the spine). Measuring centimeters, do not forget to make allowances.
After that, we place the workpieces on a piece of cloth or leather to cut out the decorative "cover" of the cover. Between the cloth and pieces of cardboard we lay a thin layer of sintepon.
The corners of the fabric are stitched, trimmed and neatrefueling. The fabric should be glued to the cardboard blank. Then these places will be closed by the flyleaf. For him, you can choose decorative paper with an interesting pattern or embossing.
By the way, making a cover, you can carefully insert an elastic band that will fix pencils and pens, not letting them get lost.
Open source
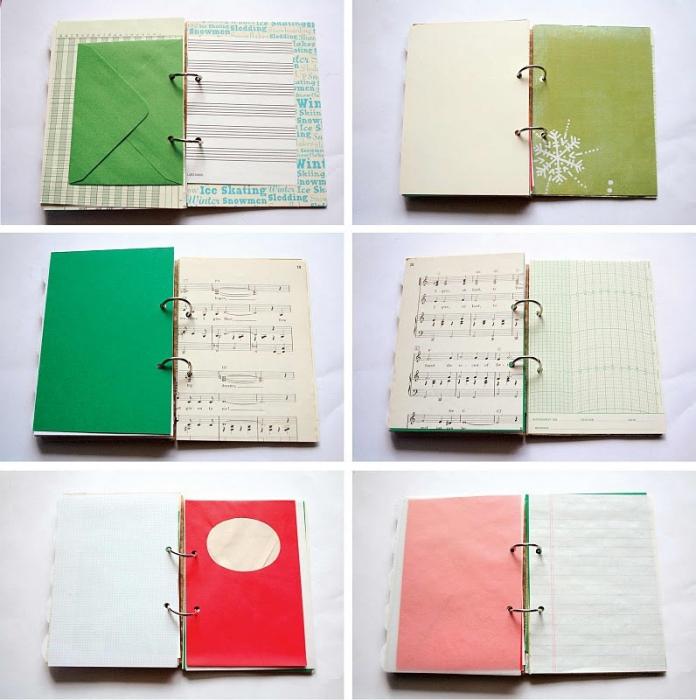
It's even easier to assemble the sketchbook with your own hands on the braces.

It is not necessary to sew such a notebook. You just need to make a hole in a pack of paper holes, and in them to put on a ring-latch, grabbing at the same time thick cardboard covers.
The cover design is in your hands. You can embroider the cardboard with the skin, apply a drawing, embossing, pasting with a cloth. You can supplement the album with a clasp, holders or pockets for pencils and pens.